How to Convert JPG to PDF Locally (No Upload, High Quality)
Convert JPG images to PDF locally in your browser without uploading the image contents.
Convert JPG to PDF NowHow to Prepare Your Images for Professional Conversion
A clean PDF starts before you touch any conversion tool. Scattered files, sideways photos, and mixed formats are what turn a two-minute task into a twenty-minute one — and the cleanup almost always happens after you've already generated the file once.
- Create a single dedicated folder for the job and move every image into it.
- Rename files sequentially (01, 02, 03) so sorting matches your intended page order.
- Check file extensions, not thumbnails, to confirm what you're actually working with (JPG vs WebP).
- Discard duplicates and test shots now rather than deleting pages later.
Those small checks make the conversion easier to review, but the final order is not determined by a folder name alone. File Maktab's current interface displays a numbered list after you select images, and that list is the reliable place to check the PDF page sequence. Treat your folder and sequential names as preparation aids; then confirm the numbered order in the browser before you create the PDF.
Keep the source files together until the PDF has been downloaded and checked. A JPG is already a compressed image format, and converting it into a PDF does not repair a photo that was blurred, cropped, or turned sideways before selection. Open the originals first when a page's orientation or legibility matters. If an image is a poor source, retaking or correcting that image before conversion is safer than expecting a PDF container to restore missing detail.
It also helps to decide what the finished document is for. A PDF prepared for a quick screen review may be perfectly usable at a size that is not ideal for large-format printing. A PDF intended for a portal may have a strict total-size cap. Write down the needed page size, order, and destination limit before beginning; the current converter offers page-size choices but does not include a compression slider or an output-size target.
Step 1: Select a Privacy-First Conversion Tool
The tool you pick determines whether your client's financial statement ever leaves your laptop. A local-first utility runs the conversion inside your browser, so the file does not need to transit a file-processing server. Do not infer that every free converter is local simply because it is free: confirm how the particular service handles the files you select.
- No-upload processing: The tool states explicitly that files are handled in-browser.
- No account required: If basic conversion demands registration, compare another route.
- Works offline: Verify offline behavior instead of assuming it; the web application and its assets must first load in your browser.
- No watermarking: Check that the downloaded output matches what you need without an added mark.
File Maktab's image-to-PDF workflow states that it processes files inside the browser, and the page labels the workbench as local processing. In practical terms, the selected image bytes are read by the browser-side conversion code and used to create the PDF there; the images themselves are not sent to a remote file-processing service by this conversion. This is a precise statement about the JPG-to-PDF operation, not a blanket claim that no website metadata or network request of any kind exists while you browse the site.
Local processing changes the privacy question, but it does not eliminate the need to review your destination. Keep sensitive originals on your own device, avoid sharing a downloaded PDF through a public link, and use an approved channel when the images contain financial, identity, or client information. A locally generated file can still be exposed later if it is saved to a shared computer, attached to the wrong email, or placed in an open cloud folder.
The webpage still has to load before its converter can run, and browser-based work uses device memory. Therefore, do not treat “local processing” as proof that the page will work after you disconnect from the internet, or as a guarantee that every batch size is suitable for every device. If you must work fully offline, use an operating-system tool that is already installed and test it before relying on it for a deadline.
Before selecting private images, check that the URL is the expected File Maktab tool page and that the interface shows its local-processing notice. Use a current browser, avoid opening a suspicious look-alike site, and do not confuse a normal operating-system file picker with uploading to a server: choosing a file makes it available to the page, while the tool's stated processing path determines what happens afterward.
Step 2: Upload and Arrange Your JPG Files
With a local tool open, loading your images is the fastest part of the process. The arranging is where attention pays off — fixing page order after generation means starting again.
- Open your prepared folder alongside the browser window.
- Select all images with the file picker; the current workbench opens the device picker rather than accepting a drag-and-drop gesture.
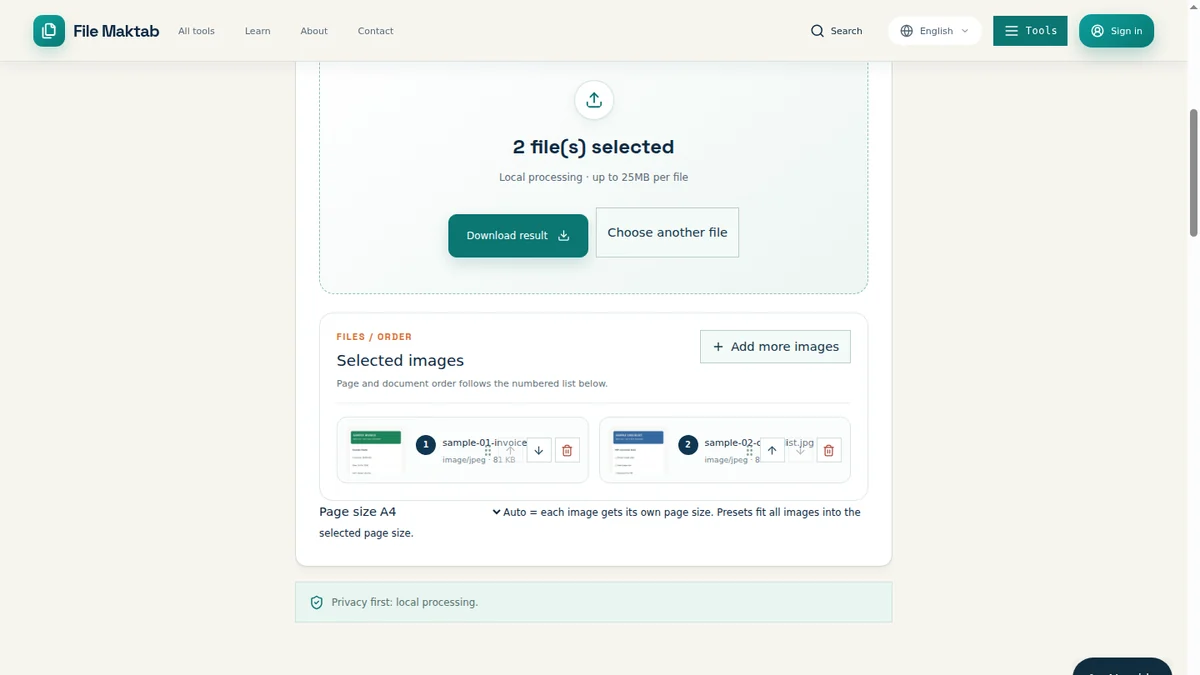
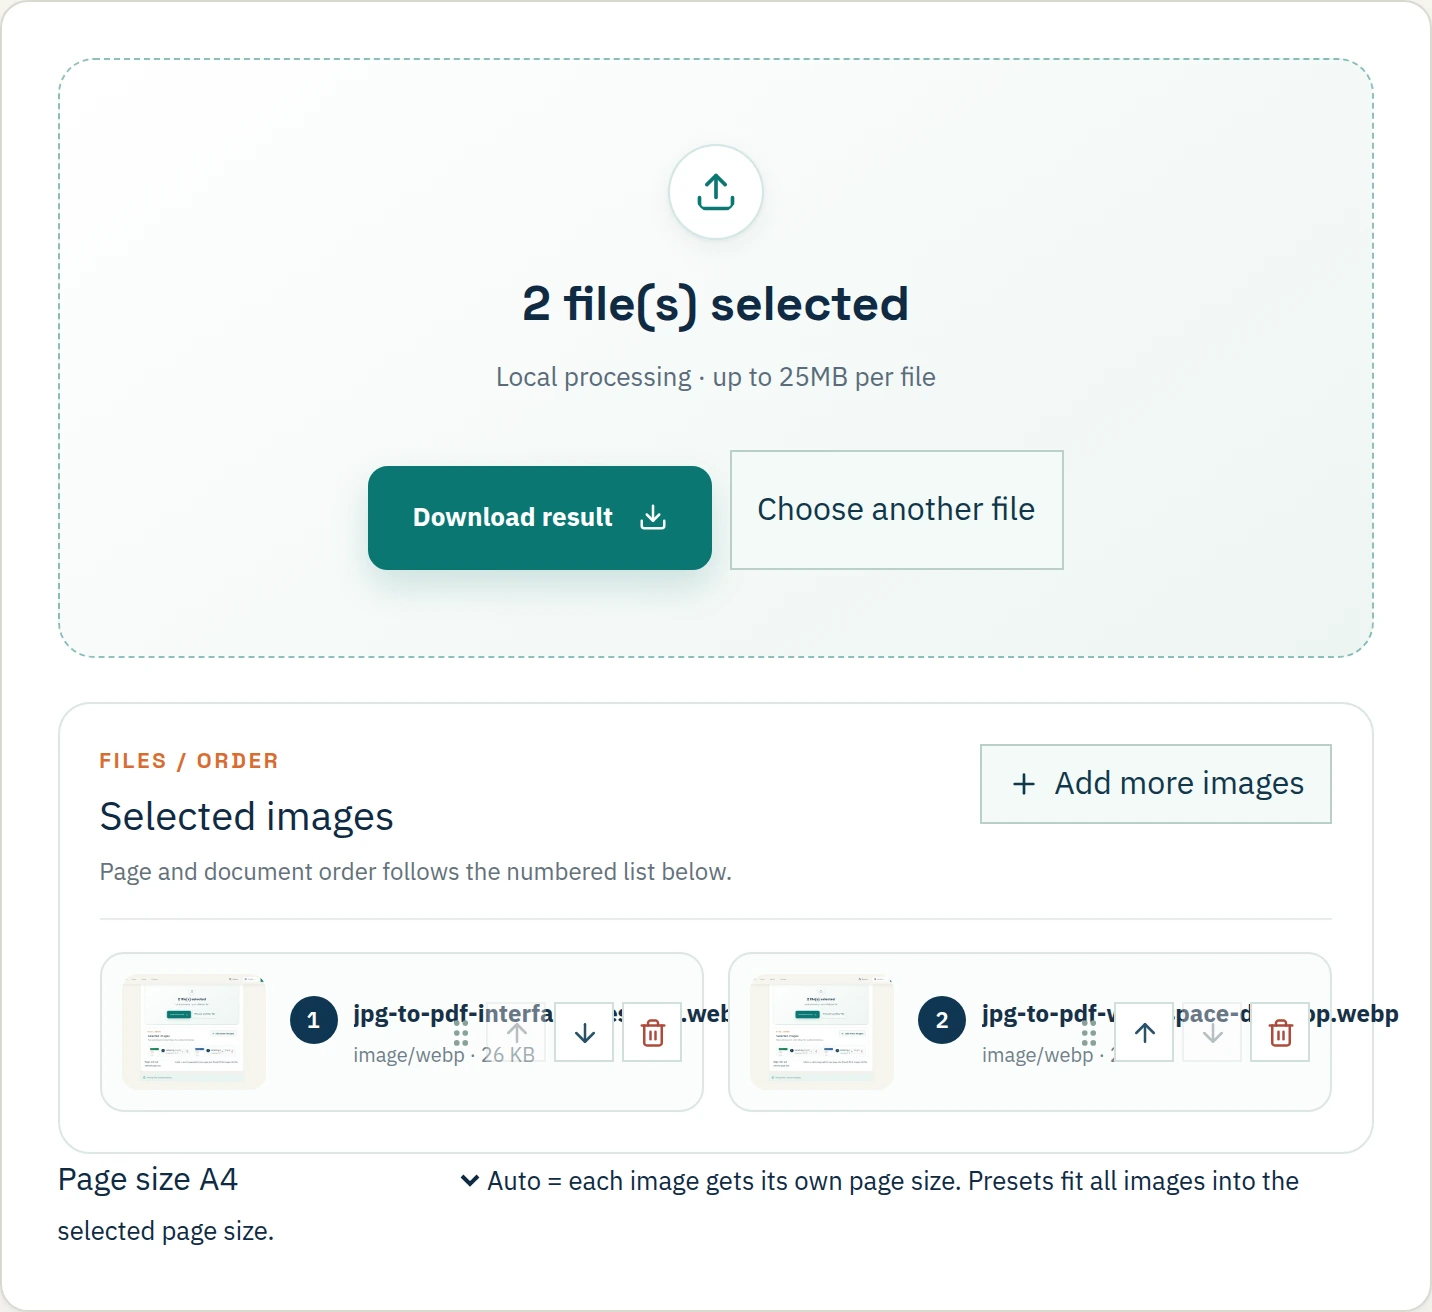
- Confirm the file count matches the number of images in your folder and check the numbered thumbnails.
- Reorder images by dragging a thumbnail or using its up/down controls; the order shown is the PDF page sequence.
- Check each thumbnail for sideways or upside-down content. The current tool has no rotate control, so correct orientation in another image tool before converting.
After selection, the workbench shows a selected-file count and a numbered image list. Use those two pieces of information together: the count tells you whether all intended files reached the selection list, while the numbers tell you the output order. The thumbnails help spot an accidental duplicate, a wrong image, or an obviously misoriented page. If a filename is truncated on screen, inspect the thumbnail and use the up/down button labels to confirm which file you are moving.
Selection order may not match the order you intended, especially when you choose multiple files from a dialog. Do not rely on the order in which your operating system displays them. Confirm each numbered card from top to bottom and move cards until the intended first page is number one. This check matters for a photo report, invoice packet, class handout, or any document in which the sequence carries meaning. If necessary, work with a smaller group so every thumbnail is easy to review.
The list lets you add more images, remove a selected image, and change positions. Those are useful corrections before conversion, but they are not a photo editor: the interface does not rotate the source, crop its edges, correct glare, or improve the contrast of tiny printed text. If a picture is sideways or difficult to read, pause and fix the source file with a suitable image editor before returning to the PDF tool.
Each selected file must be non-empty and no larger than 25MB. The selection interface does not publish a fixed maximum image count, but “no displayed count cap” is not the same as unlimited practical capacity. Larger total batches need more memory and can take longer to process, especially on a phone or older laptop. Start with a few files if you are unsure how your device will handle the full batch, and keep a copy of your originals while testing.
Step 3: Configure Output Settings, Margins, and Size Limits
Think of the PDF as a container and your image as the contents. The image is placed on a PDF page; the current tool exposes page-size choices, not custom margin, orientation, or compression controls. The browser interface lists A4, Letter, A5, Legal, and Auto (Image Size), with A4 selected by default.
- Page size: Choose A4, Letter, A5, or Legal for a standard page, or Auto (Image Size) to give each image its own page dimensions.
- Margins: There is no None/Small margin selector. Preset sizes fit and center images within a fixed 20-point inset; Auto uses a fixed 10-point inset.
- Orientation: There is no separate portrait/landscape toggle. The preset pages use their configured dimensions and fit the image while preserving its aspect ratio; Auto follows each image's pixel dimensions.
- Managing file sizes (KB to MB): There is no compression slider or 100KB/200KB output preset. The output size depends on the selected JPG data and number of pages, so a target size cannot be guaranteed from this tool.
- Combining files: Selecting multiple images creates one PDF with one image on each page; it does not combine existing PDFs in this workflow.
Choose a preset when a recipient, printer, or filing workflow requires a standard sheet size. The converter scales each image proportionally to fit inside that page area, then centers it; a small photograph will not be enlarged beyond its source dimensions by the fit operation. If the picture has a very wide or very tall aspect ratio, a standard portrait page can leave unused space around it. That is a consequence of fitting the whole image inside a fixed page, not a sign that the converter cropped the edges.
Auto is useful when matching each page to the source image matters more than using a standard paper size. The code creates a page based on that image's dimensions and adds a small fixed inset. Because every image can have a different aspect ratio, an Auto PDF may contain pages with different sizes. Check the requirements of the place where you will submit or print the file before choosing it; many portals and print workflows expect consistent page dimensions.
A PDF size target such as 100KB or 200KB is not an option in this interface. A page-size selection changes how an image is placed on a page, but it is not a control for recompressing the original JPG. When a recipient has a strict size cap, first inspect the original photos and, if needed, make smaller copies using a suitable image-compression or resize workflow. Then convert those copies, compare the resulting PDF's size with the cap, and retain the original images so that any quality trade-off remains reversible.
For a “high quality” result, begin with a sharp source image at an appropriate resolution and avoid enlarging a small source for a large print. The converter does not offer a quality selector that can restore missing pixels or undo compression already applied to a JPG. View the generated PDF at the intended screen or print size, zoom in on small text, and confirm that the page fit has not made important content too small. If legibility is not adequate, improve or replace the source image before creating another PDF.
Finally, remember that a group of images and a group of PDFs are different inputs. The image-to-PDF page creates one PDF from image files; it does not append the images to an existing PDF or merge a set of PDFs. If your task includes existing PDF documents, convert the pictures first, then use a PDF-merging workflow for the separate PDF files.
Step 4: Generate and Save Your PDF Locally
When the order and page-size selection are correct, use the green Download result button in the workbench. The tool processes the selected images on your device, creates the PDF, and starts a browser download. A handful of modest images will often finish quickly, but elapsed time depends on the images and available device resources; do not treat an instant result as a performance guarantee.
- Open the generated file before you do anything else.
- Check page count, page order, and that no image appears rotated unexpectedly.
- Confirm where the file actually landed and move it from Downloads to your client folder if needed.
- Keep your source JPGs until you are satisfied with the PDF; the browser workbench and the downloaded copy are separate items.
The expected page count is one page per selected image. Compare the first and last pages with the numbered list, and inspect the pages in between if sequence matters. Check that a duplicate was not selected, that a required image was not omitted, and that the order follows the story or record you intended. Page count alone cannot reveal a misplaced page, so review the document itself before sending it.
Look closely at the page orientation and content near the edges. A sideways source will remain sideways because the tool has no rotate button. For a preset page size, the whole image is fitted inside the page; this can leave blank space but should not crop the source. For Auto, page dimensions follow each individual image. If the receiving organization demands consistent paper dimensions, open the PDF properties or print preview and verify that the selected preset was used.
Also verify the downloaded file rather than assuming the browser saved it to a particular folder or gave it a particular filename. Browser settings, download prompts, and device file-management behavior vary. Open the actual downloaded PDF, check that it is not empty or truncated, and move a confirmed copy to the appropriate work folder. If the download did not start, check the browser's download list and permission notices before repeating the conversion.
The browser workbench keeps selected files available while the page remains open, so closing the tab is not a replacement for reviewing or saving the output. Once the PDF has been downloaded and checked, remove the selected images or close the tab if you no longer need them in the page. The source files on your device are not deleted by this process, and the locally downloaded PDF remains a separate file that you control.
How to Convert JPG to PDF Using Built-in OS Tools
When you need an offline route, your operating system may already have one. These alternatives do not use the File Maktab page and their menus can vary by operating-system version. Before depending on an OS print workflow, test it with a non-sensitive image and verify the page count, size, and order in the resulting PDF.
- Windows: Open the image in Photos, press Ctrl+P, and select Microsoft Print to PDF. (Works for JPG to PDF on Windows 10 and 11, subject to installed components and available print options.)
- macOS: Open in Preview, go to File > Print, and choose Save as PDF.
- iPhone (iOS): Select photos, tap Share > Print, pinch outward on the thumbnail to open as PDF, then use the share/save controls to keep the result.
- Android: Open the image in Google Photos or another compatible viewer, tap Print, and choose Save as PDF when that option is available.
Print-to-PDF workflows can be convenient because they use software already present on the device, but they are not identical to a dedicated image converter. A print dialog may ask for paper size, fit, orientation, or layout; the exact choices depend on the viewer and printer driver. Review those controls carefully, because a print preset can scale a photo, add page margins, or place several images on one sheet instead of creating one page per file.
For several images, pay particular attention to selection order and the option that controls how many images appear on each page. If the operating system opens each file separately, you may need to select the group from a file manager or use a viewer that supports a multi-image print job. After saving, open the PDF and check that every selected photo appears once, in the expected sequence, with the intended orientation.
The built-in route is a useful fallback when the browser-based tool is unavailable, but the result still needs a quality and privacy review. The operating system may save output in a default folder or ask where to store it. Make sure you do not overwrite the source image, and use a test document first if your task depends on exact border placement or a strict file-size limit.
Handling Advanced Scenarios: Bulk Conversion and OCR
Bulk Conversion: If you have a large folder, select a manageable batch and review it before conversion. Each file must be no larger than 25MB; there is no fixed maximum image count displayed, but browser memory and device performance still matter.
OCR (Scanned Text): Standard conversion places each image on a PDF page; it does not recognize or add searchable text. If you need to search or copy the words in a scan, use a separate OCR workflow and review the recognized text.
Why is my PDF blurry? Check the source resolution, focus, lighting, and existing JPG compression first. This converter does not expose a “high quality” or compression setting that can recover detail missing from the source.
Read our specific guide on converting JPG to PDF under 200KB
Read our specific guide on converting JPG to PDF under 300KB
Need a strict size? Learn how to Convert JPG to PDF under 200KB.
For a different limit, read our guide on JPG to PDF 300KB.
A “bulk” task is not simply a question of whether the file picker accepts multiple images. Each chosen file contributes image data that the browser must read and place in the output document. A hundred large, high-resolution photos can consume substantial memory even when every file is below the individual 25MB validation limit. Split a very large job into smaller batches, compare the PDFs, and combine them later if your document workflow allows that extra step.
Before starting a batch, check that files are the intended formats and that no empty or oversized file has slipped into the folder. A JPG image and a PDF are not interchangeable inputs: this specific converter is for images. Although the file picker may advertise additional image types, this guide deliberately focuses on JPG files that the underlying conversion path handles as JPEG. Do not infer reliable support for another format merely because a file chooser lists it.
OCR is a separate operation from putting an image inside a PDF. A photograph of a page remains image pixels when it becomes a PDF page; selecting text in the source image is not possible unless a recognition system analyzes it and adds a text layer. If searchable or selectable text is essential, use an OCR tool after conversion and proofread the result, especially for names, amounts, dates, and other details that must be exact.
For a blurry result, compare the original JPG with the PDF at the same approximate display size. If both are blurry, the source image is the limiting factor. If the source is clear but the PDF is not, verify which page-size mode was chosen, inspect the result at normal size, and retest with one image. Avoid repeated lossy saving of the source; keep an untouched original and make a corrected copy if you need to resize, rotate, or adjust contrast before converting.
How to Ensure Success: Key Takeaways for 2026
- Local-first processing is the baseline. Confirm the tool's stated handling and avoid sending sensitive images to an unfamiliar service.
- Verify page order before generating. Reviewing the numbered thumbnail list is faster than rebuilding a long PDF after a mistake.
- Use the built-in OS route as a fallback. Print-to-PDF may work without an online converter, but check the local options and test it first.
- Check your output size. The File Maktab image-to-PDF tool does not provide compression settings; verify the downloaded PDF against any portal limit.
A dependable result comes from a simple sequence: prepare the images, confirm the processing path, choose and order the files, select the right page-size mode, generate the PDF, then inspect and save it. Each check catches a different class of problem. Correct file selection prevents omissions, the numbered list prevents sequencing errors, page-size selection controls the page container, and opening the result catches issues that the converter cannot detect automatically.
Keep the source images until the recipient accepts the PDF or you have confirmed that it meets your requirements. If the destination has a page size, maximum file size, orientation, or OCR requirement, record those requirements before conversion. This avoids making several versions without knowing which one is suitable. For a strict size cap, measure the actual downloaded result instead of relying on a guessed size from the number of images.
Why Choose Local Processing Over Adobe Acrobat and iLovePDF
When you compare Adobe Acrobat, iLovePDF, Smallpdf, or another converter, compare the actual workflow and privacy terms rather than assuming every competitor handles files the same way. Some services process files on remote systems, while a local-first browser tool performs the conversion on the device. For sensitive images, that distinction can matter; for page layout, interoperability, or editing features, a different application may suit a particular job better.
File Maktab's JPG-to-PDF workbench is designed for a focused task: select multiple image files, arrange their order, choose a page size, and create one PDF in the browser. The image bytes are processed locally for this conversion, and the interface displays a local-processing notice. Basic conversion does not require an Adobe subscription or a File Maktab account. The tool is useful when those characteristics match your needs, but it is not a replacement for every function in a desktop publishing or PDF editor.
If your combined PDF is too large, use our Compress PDF tool.
Make the decision based on the file and output requirements. If you need advanced page design, a compression target, detailed color management, a digital-signature workflow, or custom rotation controls, confirm that the application you choose actually offers those controls. File Maktab's current image-to-PDF page does not expose them. For a straightforward image-to-page conversion with a visible ordering list and locally generated output, the browser workflow avoids an image upload to a conversion server.
Privacy also includes what happens after the PDF is made. Choose a storage location you control, share only with intended recipients, and retain or delete source images according to your organization's policy. No converter can decide whether an email recipient, shared folder, or public link is appropriate. Local processing helps limit exposure during conversion; careful handling remains necessary once you download and share the finished document.
Frequently Asked Questions
How do I convert JPG to PDF for free?
Use a local browser-based tool like File Maktab. Select your images, check their numbered order, and download the PDF; basic conversion does not require a paid subscription or account.
Is it safe to convert JPG to PDF online?
It depends on how the tool works. File Maktab processes the selected image bytes locally in your browser for this conversion; some online services instead upload files to a server, so check the individual service's privacy terms.
How do I convert JPG to PDF without Adobe Acrobat?
You do not need Adobe Acrobat for this task. Open the browser-based File Maktab tool, select your JPG images, arrange them, choose a page size, and download the PDF.
How do I convert JPG to PDF on iPhone?
You can use the built-in iOS Print workflow, or open File Maktab in Safari, select the JPG images, review their order and page size, then download the locally generated PDF.
How do I convert JPG to PDF on Mac?
Open the JPG files in Preview and use File > Print > Save as PDF, or open File Maktab in Safari or Chrome and use its browser-based image-to-PDF tool.
How do I make a JPG 200KB PDF?
File Maktab's current image-to-PDF tool has no PDF compression slider or 200KB preset, so it cannot promise a target size. The output depends on the source images and the number of pages; prepare smaller source images before conversion and check the downloaded PDF against the destination's limit.
Can I combine multiple JPGs into one PDF?
Yes. Select multiple JPG files, review their numbered thumbnails, and reorder them with drag-and-drop or the up/down controls. The tool creates one PDF page for each selected image.
Does converting JPG to PDF reduce quality?
The tool does not expose a quality or compression setting, so there is no quality level to choose. The result uses the selected image on a PDF page; the source JPG's existing compression and resolution still affect how sharp it looks when viewed or printed.
Why is my converted PDF blurry?
The source JPG may already be low-resolution, heavily compressed, or enlarged when placed on the page. File Maktab's current tool has no image-quality or compression control; inspect the source and the downloaded PDF at the intended viewing or print size.
Can I convert JPG to PDF without uploading?
Yes. File Maktab processes the selected image bytes in the browser for this conversion; the JPG contents are not uploaded as part of the PDF-generation operation. The web page and its application assets still need to load in your browser.
How do I convert JPG to PDF on Windows 11?
You can use Microsoft Print to PDF from a compatible image viewer, or open File Maktab in Edge, select your JPG images, review the order and page size, and download the PDF.
Is there a limit to how many images I can convert?
The current tool sets a 25MB maximum for each selected file and does not show a fixed image-count limit. Large batches still use browser memory and device resources, so work in smaller groups if the browser slows down or runs out of memory.
Can I convert JPG to PDF without losing digital signature?
A JPG-to-PDF conversion creates a new image-based PDF; it does not preserve or validate a digital signature or its signed byte range from an existing PDF. Keep the original signed PDF if its digital signature must remain verifiable.
Do I need an account to convert JPG to PDF?
No account is required to use the basic File Maktab JPG-to-PDF workflow. Select the files in the browser and download the result without signing up.
What is the best free tool to convert JPG to PDF?
The right tool depends on your privacy, page-size, and file-size needs. File Maktab offers a free local browser workflow for selecting JPG images, ordering them, choosing a page size, and downloading one PDF without uploading the image contents.
Related guides: After converting to PDF, you may need to Compress PDF, Merge PDF, or Convert PDF to Word.
File Maktab content is educational and reflects current tool limits. No affiliate links are active in this version.